Showing posts with label Summer. Show all posts

Tuesday, July 15, 2014

July Ipsy Bag

Hello lovies, I hope all you beautiful people are having an amazing week! So today I came home to my little pink bag! And by little pink bag I mean my Ipsy bag.

I recently just switched over to Ipsy last month, after my May Birchbox pushed me over the edge. Birchbox just wasn't cutting it for me. I wasn't happy relieving mostly hair care products and snack samples. I wanted a subscription that I would be able to try the newest high end makeup products out on the market, so I decided to give Ipsy a shot. Now last month I didn't post an Ipsy review, because I wanted to get a feel for it.

Ipsy is a monthly subscription box for $10 a month. It is very similar to Birchbox, but it gives you samples based on what you are interested in. When you first subscribe to Ipsy you take a style quiz so they know what products will best fit your needs and interests. There also is a reward point system just like Birchbox did, but I find it more easier and that they give you more opportunities to earn points so you can use them in the future. Ipsy also gives you a cute bag based on the month's theme that they send your makeup in. Overall I think this is a great subscription company and they put a lot of detail into making sure you like what you get.

 Products in my bag:
This first thing I got, is the Hang Ten Dark Tanning Oil in SPF 8. This smells so good, and is all natural. It comes in a little spray bottle and is water resistant for up to 40 minutes. Like I said all the products are organic and natural and is fragrance free. This is going to be great for trying out and I am very excited to try this out.

This product I am so excited and giddy to try out. This is the Healthy Sexy Hair Soy Renew Beach Spray. Now I love my Sexy Hair products. I live off of the Big Sexy Hair Hairspray and I have been dying to try out the Healthy Sexy Hair line. But this product is a conditioning and texturing spray with argan oil. You can use this on wet hair to give you a beachy look or use it on dry hair to add more volume. Can't wait to see how this works! 

This is the Pixi Tinted Brilliance Balm in Pretty Pink. I have seen this product at Target for a very long time and have heard many good things about it, but have never gotten around to try it out. So this is also another product that I can't wait to try. It also has a minty smell which I LOVE anything minty. 

This product is more of a higher end product. It is the bareMinerals 5 in 1 BB Advanced Performance Cream Eyeshadow in SPF 15. When I first saw this product in my bag I was very upset. I thought it was just a face BB cream, and as you can see it is extremely dark so I didn't think I would've been able to use this. But after I really looked at it I read that it was an eyeshadow. So that is awesome! This is supposed to be long wearing color, a built in primer eyeshadow, it is supposed to brighten the eyes, smooth the look of lines and wrinkles, and protect against UV rays. I am not sure what color I received but there are 10 neutral shades, and mine is the darker of them.

The last thing I got was another product I heard and seen a lot about, but never got to try out. It is the Pop Beauty Sunkissed Bronzer in the shade Secret Sunshine. Now I have been in the market for a new bronzer because let's face it my bronzer is very out dated and is broken. This is an amazing size for a bronzer and will last me quite sometime. I actually do think that this is a full sized product (don't quote me, I am not 100% sure). It also seems like there is no shimmer in this bronzer either so I am very happy I got this. 

I hope you enjoyed reading this. I am very happy and excited with my Ipsy bag this month, and I do hope that it keeps being this good. 
Thanks for reading, and stay tuned for more! 


Wednesday, June 18, 2014

Foodie Review | Noosa Yoghurt with Honey


I'm back!! Sorry I have been away for so long, but I have come down with a major case of writers block. I haven't tried anything new, and to be honest I'm a broke white girl! So I haven't been shopping much because I can't afford a lot, which leaves me little to write about.

But I have tried something new this past week, and it isn't anything to do with makeup, beauty, or fashion, but it has become my new favorite obsession. I stumbled upon this new brand because of a coworker of mine. He and I share the same love for yogurt and health so we are always comparing what's best out there. He introduced me to this yogurt and I was not feeling it at first. I love my Chobani Strawberry Yogurt and I never thought that anything would replace that. I was wrong.

I didn't bring a lunch to work one day so I decided to go to Target and pick up some goodies on my lunch to snack on to hold me out for the rest of the day. I saw this and I decided why the heck not?

So a little background of this brand before I go into telling you how much I am in love. Noosa is an Australian based company who use milk that is grown on a farm, have no artificial hormones (rBGH free), and use real honey and fresh fruit. This yogurt is also gluten-free and comes in twelve different flavors.
You can check out there website here: http://www.noosayoghurt.com/

So this yogurt is amazing, as you might have already guessed. Unlike regular Greek yogurts in this flavor that I have tried it does not give you that sour/tart taste. It is much more sweeter than you're typical Chobani yogurt but healthier and flavorful that Yoplait. It has a very creamy consistency and its so smooth. It is happiness in your mouth. The best way I can describe the taste is cold milk with lots of honey. It's sweet but not overpowering. I purchased an 8oz. container of this and it last me through two sittings. You get a lot of yogurt in the container. And even when you put it back in the fridge it still tastes just as good. Now as for any Greek yogurt be sure to mix it well before you eat it because most of the flavor is at the bottom. But it tastes very amazing and it really does fill you up. I'd recommend this yogurt to anyone who loves yogurt. It is more on the pricier side, right about the same as a Chobani yogurt. $2.50-$3. But unlike Chobani you get a lot more product for your money.

Thanks for reading you guys! I hope you enjoyed this and let me know what else you'd like to read.
Have a fantastic week!


Sunday, June 1, 2014

Out 'n About Summer Look


Now that summer is here and school is out many people are spending their time having fun outside. Now the only downside about being outside in the hot air is that it will melt off your makeup! It's currently 84 F here in Chicago and it is still climbing and I will be out all day for a soccer game, so I want to put on makeup but I also don't want so much that my face is going to sweat it all off and look disgusting by the end of the day.

Foundation

Now I'm not going to start out with putting my whole foundation routine on. Instead, I will be using my Tarte Amazonian Clay Foundation and that's about it. If your under eye circles are purple or you want to get rid of unwanted color you can use a bit of your favorite concealer to hide them, but today I do not feel the need to. The great thing about this foundation is that it has SPF built in, and that is crucial for summer. You want to make sure you at least have some sort of SPF on your face, ears, and shoulders (that's at least, but you always want SPF everywhere that your skin is exposed) to prevent yourself from burning or even worse.

After I applied my foundation I took my Rimmel Stay Matte Powder and with my Real Techniques Powder brush I pressed that into my skin. You want to make sure that you are pressing the powder into your skin because this way it will prevent the foundation from moving and making you more oily. 


Eyebrows

Next I am going to go in with my Anastasia Brow Wiz pencil and just fill in my eyebrows. This is totally optional, I have very sparse eyebrows and I just want to fill them in so they aren't so plain looking, but if you don't want to that's totally up to you! You should keep in mind though that the sweat built up on your forehead will tend to move around the color and it could turn ugly. Then after I do that I'm just going to go in and set it Maybelline Great Lash Mascara in clear so it will be less likely to move on me.

If you don't want to fill in your brows but you do want to add some color to enhance them I recommend Benefit's Gimme Brow, it will make your eyebrows seem fuller without much.

Eyes

 After doing my eyebrows and setting them, I put on my ELF eyeshadow primer. Normally I wouldn't wear eyeshadow to go out in the hot air, but today I was feeling it. So I stayed as neutral and minimal as possible. All my shades came from the Urban Decay Naked palette.
I took the color Sin and pressed that all over my eyelid. 

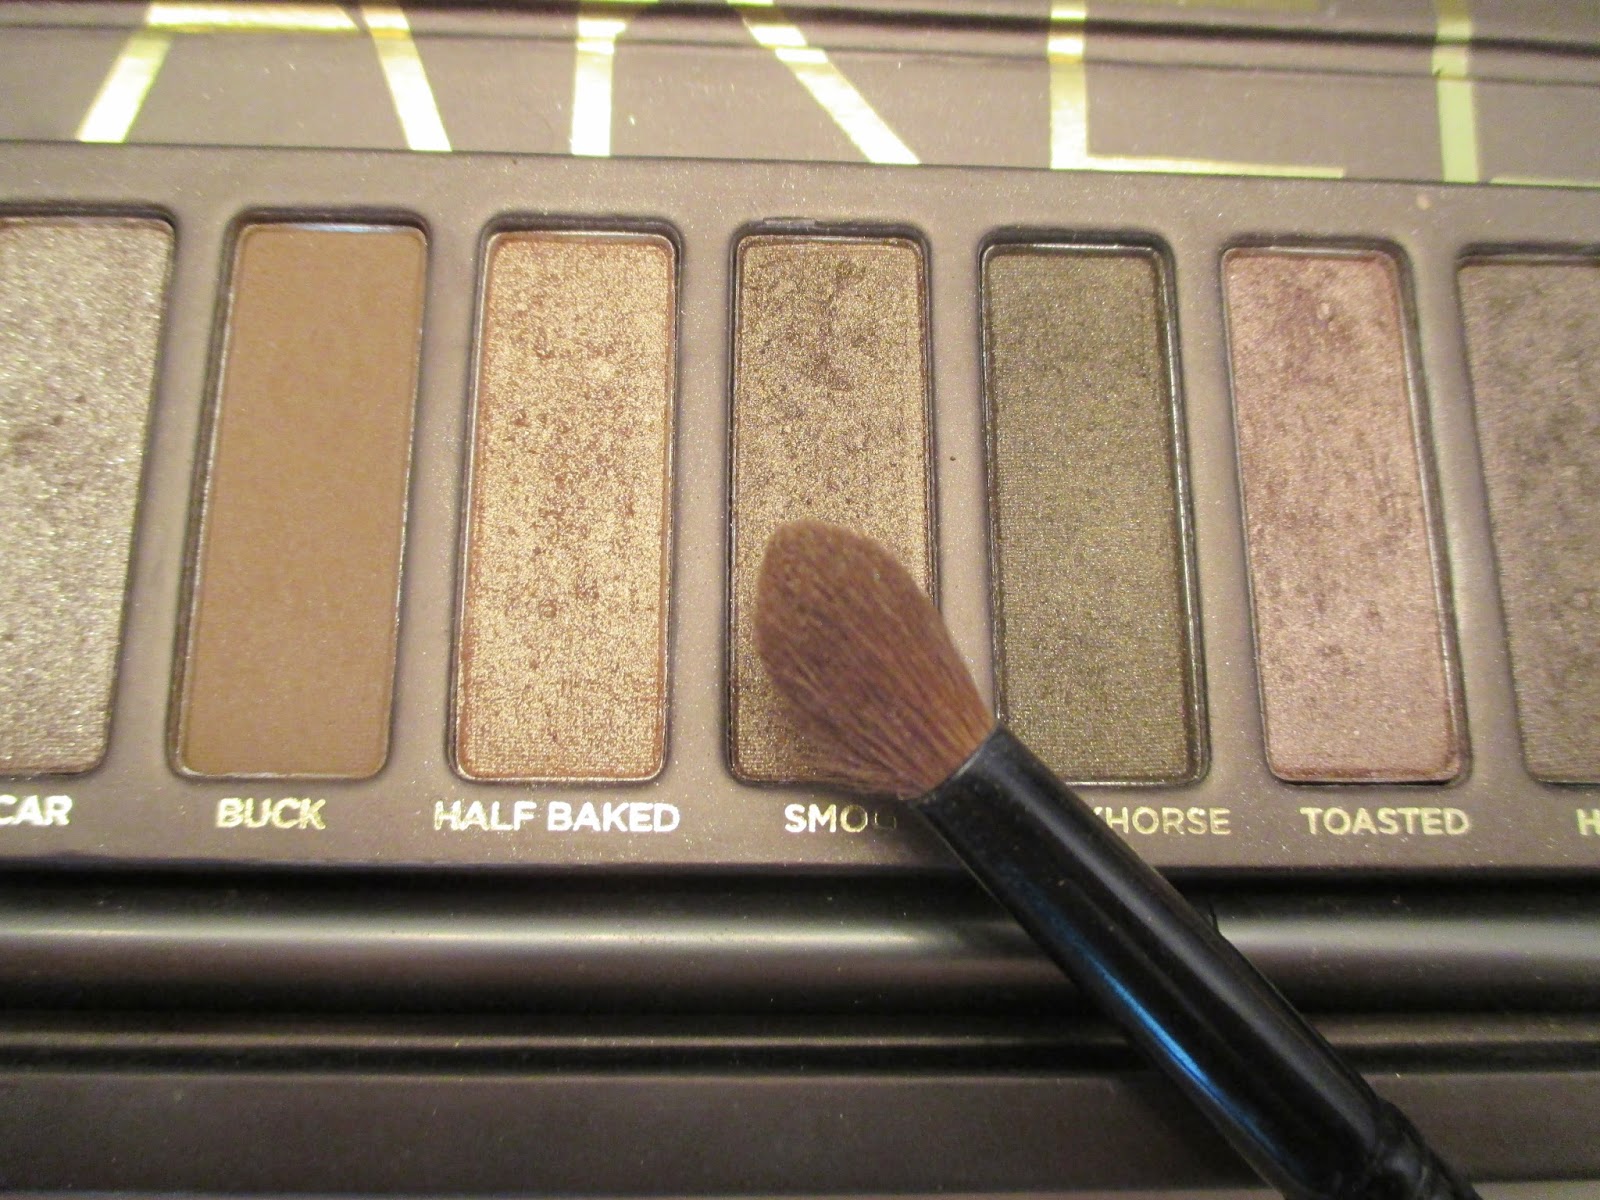
Then taking a blending brush I took Smog and lightly brushed it into my crease using windshield wiper motions. You want to make sure that it is completely blended in so it doesn't look smokey or too harsh.

Then with a small tapered brush I took Darkhorse and put that on my lower lash line to create some dimension because I am not using any eyeliner for this look. 

Now going back to Sin I took another smaller blending brush and put that color in my inner corner and toward the Darkhorse color I put in. I want to blend Sin into that to create a lighter to darker look so it looks more natural. 

To finish off the look I curled my lashes and used the new Maybelline Falsies Big Eyes. This is great because it has a brush for the upper lashes and another one for the lower lashes. It's great for giving you the appearance of longer lashes and it is very good at separating them too. 

Face

I didn't contour or use blush on my face. But what I did do was take my bronzer and put that on the ends of my cheeks closer to the ears to give me a little bit of color and dimension. 

To make everything stay in place in this heat I used the Urban Decay De Slick setting spray all over my face. 

Lips
I didn't want to use any lip gloss or stick so I just used my EOS lip balm to protect my lips from the sun and it smells amazing. 

I hope you enjoyed this post. Let me know if there is any other tutorials or posts you want to see. 

Thanks for reading!

Sunday, May 18, 2014

Golden Summer Look


Products I Used

Hope everyone is having a fantastic weekend! Today I am going out to a birthday party, so before I leave I deiced to show you all what I used and how to achieve this look. It is perfect for summer, and very easy to achieve. This look is also very versatile and can be used as a day or night look. I chose to use more of golden colors and glitter to give my eyes some pop today. Normally, I tend to stick to neutral based eye shadows, and even though these aren't crazy out there colors it still gives me a little bit of fun to work with. I think this look would be great on any eye color and skin tone, because it still has a natural base but will enhance any person's wonderful features, without stepping out of your comfort zone. 

Foundation and Concealer 
Today I started off using my Tarte Amazonian Clay 12 Hour Full Coverage Foundation with SPF 15 in the color Light Sand, because it is bright and sunny outside. I put small dabs all over my face using my fingers and then blended it all together using my Flat Top Foundation Brush by Crown Brush. I normally don't use a foundation brush when I am in a hurry, but today I had plenty of time to do my makeup so I wanted that clean airbrushed finish that this brush gives you. 


Then I took this 15 Color Camouflage Concealer Palette that I got off of TopHatter, but you can find on eBay for a relatively cheap prices. I used the yellow shade (second row from left, very top) to conceal my under eyes and make them appear lighter. Then I used the shade on the right of that color to go over any redness or blemishes. I used my Stippling Brush from Real Techniques to blend the concealer into my foundation. 

Powder and Bronzer

After I put on my foundation and concealer I went in with my NYX Stay Matte But Not Flat Powder Foundation in the color 02 Nude and my Powder Brush from Real Techniques to set my foundation to make sure that it doesn't move throughout the day. I really like this powder because it doesn't leave you feeling cakey and it is a great price for a powder. 


After I set my foundation I always go in with bronzer and contour my face. I start out using my Angled Brush from Crown Brush and take my Wet 'n Wild Bronzer in the shade 739 Ticket to Brazil and go in and contour the hollows of my cheeks, my nose, my forehead down to my temples, and my jaw line. Using just the Angled Brush doesn't blend in the bronzer very well so I go in again with my Real Techniques Powder Brush and blend everything out so there is absolutely no harsh lines. I have not seen this bronzer in stores for a long time, so I am pretty sure it is discontinued, I have had this bronzer forever and I just recently hit pan on it. 

Brows

After I get done putting on my foundation and powders I go ahead and do my eyebrows. I use the Anastasia Beverly Hills Brow Wiz in the color Medium Brown and I just go over the natural shape of my eyebrows and bring out the end so that my eyebrows are a little longer. I start in the middle of my eyebrows and then go in using lighter and gentler strokes toward the front of them. You want your eyebrows to transition lighter to darker. Lighter being in the front. I do this to fill in the sparse hairs in my brows and to make them longer because my eyebrows are pretty short. I love this brow pencil, it glides on very nicely and it is thin enough to not make any mistakes. I then use the spooly brush at the end of my pencil to go in and blend any harsh lines there could have been. I then go in with Maybelline Great Lash in the color Clear to just set my eyebrows in place. 

Eyes

Today, since I wanted the colors to really stand out, I used Rimmel  London's Scandal Eyes Eyeshadow Stick in the color 002 BulletProof Beige, instead of a primer. This gave my eyeshadow a nice base to stick to and since it was gold it made the color even brighter. I just rubbed this crayon all over the top of my eyelid and lined my bottom eyelid with it as well. 


I first went in with Smog from the Urban Decay Naked Palette with my Thin Eyeshadow Brush from Crown Brush and put that only on the outer quarter of my eye.


Then taking Half Baked from the Urban Decay Naked Palette and my Sonia Kashuk Eyeshadow Brush I dabbed this color careful on top of my lid and going slightly over the Smog I put on earlier so it transitioned from lighter to darker. You want to use dabbing motions when using glitter to prevent fall out. 


Then taking my Soft Blending Brush that I got from Target I took a little of that Smog color and when in my crease with it using windshield wiper motions. 


Having Smog on my crease made it really smokey, and since this was a daytime party I wanted my look to be more toned down. So I took my Angled Blending Brush from Crown Brush and took  Bootycall from Urban Decay Naked 2 Palette and went over the edges of smog that was in my crease to soften the color.


Now to make the eye look more brighter I took my Small Tapered Eyeshadow Brush from Crown Brush and I took Virgin from the Urban Decay Naked Palette and placed that on my brow bone and the inner tear duct of my eye.


Then going in with that same Tapered Brush I took more of Half Baked and lined my lower eyelid with it where I put the eyeshadow crayon earlier. 


I used my E.L.F Liquid Liner in Black to line my upper eyelid and winged it out. 


To finish off the eyes I curled my eyelashes and then went in with my L'Oreal Extra Volume Collagen Mascara. 

Blush 

To complete the look I used Maybelline Fit Me Blush in Medium Coral to just give a little bit of color to my cheeks. I didn't want to use anything pink or red because I really wanted my eyes to have the most attention when it came to color. So I just lightly put this on the apples of my cheeks.